Wednesday, October 15, 2014

Learning - (Eclipse) - which IDE do I download?

I'm downloading the latest Eclipse IDE on my laptop with Windows 8 and wanted to make sure I'm downloading the right IDE (see http://www.eclipse.org/downloads/compare.php). There are plenty of plugins for Eclipse, but it's smart to have the most useful IDE before I start adding useful plugins to my IDE.

Because I'm going to develop web applications using Java, I'm downloading the Java EE package solution. I've used this plenty of times at work. So why did I check now? Well, I never know what updates are made to OpenSource tools and it's good practice to know your tool(s). ;-)

Here's what my Java EE Package Description includes (https://www.eclipse.org/downloads/packages/eclipse-ide-java-ee-developers/lunasr1):

  • Data Tools Platform
  • Eclipse Git Team Provider (and I will be using this to store my code to GitHub)
  • Eclipse Java Development Tools
  • Eclipse Java EE Development Tools
  • JavaScript Development Tools
  • Maven Integration for Eclipse
  • Mylyn Task List
  • Eclipse Plug-in Development Environment
  • Remote System Explorer
  • Eclipse XML Editors and Tools

On a side note, I'm also reading up on Appcelerator (see http://www.appcelerator.com/) that my Tech mentor recommended. This is awesome!

Wednesday, June 25, 2014

Shaping Minds #20140620: Ivory Towers

My wonderful friend,

Every now then, it is good to sharpen your mind with some perspective outside of your own. My wife and I believe one of the best ways to sharpen your mind and stay keen on the intellectual development of the world (or growing of society) is through watching documentaries.

I learned about this movie theater in Washington, DC called "E-Street Cinema" during a last minute desire to watch a movie before our move to Friendship Heights. I wanted to see "Edge of Tomorrow" at the Regal in Gallery Place, but the timing didn't work for us. So, my wife said we should go to E-Street Cinema and we did. When deciding on a movie, my wife pointed out that this movie "Ivory Tower" is a documentary. I LOVE documentaries. At last, this became my 1st documentary that I watched in a movie theater. Pretty awesome!


Anyhow, my wife and I really enjoyed this movie. At the end of the movie, I was joking around and saying that we should stay a little through the credits as we might see some extra clips like we do with comic movies. Well, God put the joke on me. A theater director came to the front and announced that a panel discussion would immediately take place now that the movie was over. Anyone who had questions or comments were encouraged to participate. Next, four people who were a big part of the documentary came up to the front of the theater and the dialogue between the panel and the audience began. "How outstanding is this!", I thought. Can you imagine having Ironman (if he were real) approach the front of the stadium seating in the movie theater to answer any questions on how he saved the world? That would blow my mind! Hahahaaa...

After the great discussion and listening to questions and comments, Victoria Sobel, one of the cast and panel members, was selling t-shirts to support her organization's mission and taking photos with people. This is making history and I was so honored that I could get a picture with Victoria. She's awesome!


Of course and naturally, I strongly recommend that you go see and support this documentary. I just *liked* them on Facebook. If you're near by the Cooper Union in NYC, I urge you to understand Victoria's organization and movement more. After all, I definitely believe what Peter Cooper believes: education should be free to all.


Thursday, May 22, 2014

Learning IE - F12 key opens Developer Tools

I have been working with Internet Explorer (version 8) because my company still mandates that Developers test in IE8 since our customers mainly use IE8.

Well, sometimes we developers run into issues and I struggle to figure out what the issue is when the app works fine in FireFox or Chrome. Today, I accidentally stumble on this cool trick.

Open Internet Explorer.


Press key F12 and viola! the IE Developer Tools window opens.

Not sure how useful this is, but now we know it exists! (Instead of wondering why IE doesn't have one like FireFox and Chrome, lol.)

Saturday, April 26, 2014

Learning NetBeans - Creating Database

I ran into an issue today where my professor's tutorial didn't work out as planned. My GlassFish Server 4 console stated "sample database not found" or something like that. I'll have to make sure to take the screenshot next time.

Anyhow, to resolve this issue, I went into the directory instructed by my professor and renamed my folder "sample" to "sample_original". There was nothing in this folder but a subfolder called "log" with log files. Oh, here is where the directory was:

C:/Users/gradney/.netbeans-derby

This is the default location (where my %HOME% is C:/Users/gradney) that NetBeans will create its Derby (database) directory. This is NetBeans' Java database, I believe.

Once I renamed this folder to "sample_original" (instead of deleting it because I might need this folder later), I went back into NetBeans and created the database from within the IDE. Here's the YouTube I followed (from the first few minutes) and it worked.


Quick Instruction
Open NetBeans IDE > Go to Services tab/view > Expand Databases > Right-click Java DB > click Create Database > enter Database Name (like 'sample') > enter Username (like 'app') > enter Password (like 'app') > click OK.


Friday, April 25, 2014

Learning NetBeans - IDE Knowledge Nuggets

Why re-invent instead of leverage (what already exist wonderfully)?
Here I am leveraging other people's blogs, answers, etc. on learning NetBeans IDE.
*QI - Quick Instruction.

NetBeans - Top 10 IDE PC Keyboard Shortcuts

My Favorites
I don't have any of my own yet, but will update as I do make my own list.

Refer [2]

http://netbeanside61.blogspot.com/2008/04/top-10-netbeans-ide-keyboard-shortcuts.html

NetBeans - Adding Maven Dependencies (similar to updating & removing)

QI: Add Dependency
Open NetBeans > Open Project > Right-click on folder Dependencies > Add Dependency > Query by library name (e.g. servlet-api) > select from Search Results > click Add.
QI: Remove Dependency
Open NetBeans > Open Project > Expand folder Dependencies > Right-click on library> select Remove Dependency.
*Since I could figure out how to add, then I knew how to update and remove (library) dependencies as well.

Refer [2]

http://mrhaki.blogspot.com/2009/07/add-maven-dependency-in-netbeans.html


Thursday, April 24, 2014

Learning Java - What's BMP, CMP, and JPA?

Today, I am learning the difference among Java's ways to interact with a database or storage device.

JPA: Java Persistence Architecture API

The JPA is a Java specification for accessing, persisting, and managing data between Java objects/classes and a relational database. JPA was defined as part of the EJB 3.0 specification as a replacement for the EJB 2 CMP Entity Beans specification. JPA is now considered the standard industry approach for Object to Relational Mapping (ORM) in the Java industry.
JPA allows POJO (Plain Old Java Objects) to be easily persisted without requiring the classes to implement any interfaces or methods as the EJB 2 CMP specification required. JPA allows an object's object-relational mappings to be defined through standard annotations or XML defining how the Java class maps to a relational database table. JPA also defines a runtime EntityManager API for processing queries and transaction on the objects against the database. JPA defines an object-level query language, JPQL, to allow querying of the objects from the database.

Why JPA replaced BMP/CMP?

Entity Beans calls for to much complicated code and heavy resource footprint, and they could be used only in Java EE application servers because of interconnections and dependencies in the source code between beans and DAO objects (or persistent framework).

Reference(s): 

http://en.wikibooks.org/wiki/Java_Persistence/What_is_JPA%3F
http://en.wikipedia.org/wiki/Java_Persistence_API
http://www.oracle.com/technetwork/java/javaee/tech/persistence-jsp-140049.html

CMP: Container-Managed Persistence

A CMP bean is an entity bean whose state is synchronized with the database automatically.
In other words, the bean developer doesn't need to write any explicit database calls into the bean code; the container will automatically synchronize the persistent fields with the database as dictated by the deployer at deployment time.
When a CMP bean is deployed, the deployer uses the EJB tools provided by the vendor to map the persistent fields in the bean to the database. The persistence fields will be a subset of the instance fields, called container-managed fields, as identified by the bean developer in the deployment descriptor.

Reference(s): 

http://www.jguru.com/faq/view.jsp?EID=1087

BMP: Bean-Managed Persistence

A BMP bean is an entity that synchronizes its state with the database manually.
In other words, the bean developer must code explicit database calls into the bean itself. BMP provides the bean developer with more flexibility in how the bean reads and writes its data than a container-managed persistence (CMP) bean. CMP bean is limited to the mapping facilities provided by the EJB vendor, BMP beans are only limited by skill of the bean developer.
The ability to code an entity bean's persistence logic explicitly is important when the EJB container's CMP features are insufficient to meet the needs of the entity bean. Entity beans that need to synchronize their state with several data sources are excellent candidates for BMP. So are beans that need to access data sources (possibly legacy systems) that are not supported by CMP. In addition, BMP bean are often employed when a vendor's CMP facilities are not sophisticated enough to handle complex Object-to-Relational mapping.

Reference(s): 

http://www.jguru.com/faq/view.jsp?EID=1090

Remember

  • JPA replaces CMP & BMP as Java industry standard's Object-to-Relational Mapping (ORM).
  • CMP bean is limited to the mapping facilities provided by the EJB vendor; BMP beans are only limited by skill of the bean developer.

Additional References:


Learning NetBeans - Setting Default Browser

I thought I had set my default browser to use the Embedded Webkit Browser included with NetBeans. But, my default browser still opens my HelloWorld webpage in Google Chrome (my OS's default web browser that I had set).

Here's what I did:
  1. Open NetBeans IDE > Add HelloApp web project > click Run icon (or in menu bar, select Run > Run Project).

What happens is the index.html (default webpage for web project) displays in my operating system's default browser which is Chrome.


However, I would like my project to display the webpages in NetBeans' embedded webkit browser.

Solution: To fix this, here's what I did:
  1. In menu bar, select Run > select Set Project Browser > Embedded Webkit Browser.
  2. Click Run icon (or in menu bar, select Run > Run Project).


Now my project displays in the NetBeans' embedded webkit browser.


To update the default browser for the project, simply follow the process again (mentioned in the "Solution" section) and select one of the browser options.

Wednesday, April 23, 2014

Learning Java - What is "new String[0]"?

I came across some code as:

row.add( row.toArray( new String[0] ) );

But, what does "new String[0]" mean?

I found some good answers at the following (StackOverflow site):

According to my code, since my "row" object is not a granddaddy Java type Object but a String type, I want to add a row of String type to the existing row(s). By telling the method .toArray() to return reference type of String and not Object, my row will add a new array of Strings. By passing '0' into the String array, we are declaring to return the type only.

Here's a combined answer taken from folk at StackOverflow:
It is the array into which the elements of the Set are to be stored, if it is big enough; otherwise, a new array of the same runtime type is allocated for this purpose.
So that, in this example, you get back a String[]. The one without any argument gives back to you an Object[].
See you have 2 versions of this method:
By passing String[] array, you are using the generic version.
Object[] toArray(), returns an Object[] which cannot be cast to String[] or any other type array.
T[] toArray(T[] a) , returns an array containing all of the elements in this set; the runtime type of the returned array is that of the specified array. If the set fits in the specified array, it is returned therein. Otherwise, a new array is allocated with the runtime type of the specified array and the size of this set.


Troubleshoot - (Eclipse) Debug Error: "Model Proxy installed notification job"

Hello, hello!
Did you run into this "Model Proxy installed notification job" Error, too?

So, I ran into this bizarre error in Eclipse IDE (Juno version) while debugging some code. The error title is "Multiple problems have occurred" and the message is:
'An internal error occurred during: "Model Proxy installed notification job". '


I thought if I clicked on "OK" and perhaps restarted Eclipse IDE, then this error would resolve itself due to some Eclipse caching or what not. Anyhow, this thought failed. So, before I started trying all kinds of crazy stuff, I googled and found this answer @ http://stackoverflow.com/questions/14611383/eclipse-debugger-error-model-proxy-installed-notification-job

However, those instructions still didn't work for me (from stackoverflow). I went back into Eclipse, opened the Debug perspective. Error displayed again. Click OK on error dialog.

Then, I noticed something strange in my Breakpoints view. Although all of my breakpoints "looked" like they were removed, my 'Remove All Breakpoints' icon was still enabled. Strange, because shouldn't this icon be disabled if all of my breakpoints are removed?

*click on picture to enlarge view*

So, let's try something. In the Breakpoints view, I clicked on the icon to Remove All Breakpoints (and 'yes' that I am sure). And now I see the Breakpoints view I am expecting along with the 'Remove All Breakpoints' icon disabled.

*click on picture to enlarge view*

To test and make sure my error was resolved, I switched to Java perspective and back to Debug. No error displayed. I removed the Breakpoints view and re-added the Breakpoints view. No error displayed. I left my Eclipse at the Debug perspective and restarted Eclipse. Still no error. AWESOME!!! Issue resolved and have a nice day! Hahahaaa....

P.S. I also removed all the .bak logs in ./workspace/.metadata directory. I don't think this was related to the Debug error, but making note just in case.

Saturday, April 19, 2014

Learning - Servlets with Cookies (in NetBeans IDE)


Hey Expert! (if you're not already, you will be!)

I'm not sure if anyone else has seen this issue, but I was going through one of the Hands-On tutorials (using PC) and pressed Alt+Enter to search for classes to import (since Ctrl+Shift+I was not triggering the Import). The dialog opened a set of libraries to choose from. Does it matter which javax.servlet.* to use (version?, etc.)? I'll go back through and double check my dependencies, but just thought I would ask


When I manually add the imported Class, remove the import, and declare the Cookie object, then I see the option to auto-import http.Cookie class. Any ideas on this behavior with NetBeans IDE?

<<I still need to research this behavior in NetBeans IDE.>>

However, I did get an answer from my professor regarding how the library we use in our Servlet does matter. Here's what he says:

Yes, it does matter.  You want to make sure that we pick up Servlet 3.1. If you select javax: javaee-web-api 7.0, you will get *all* Java EE 7 (Web Profile) APIs, and not just servlet 3.1. As an FYI, this jar file does not contain implementation of the Java EE 7 APIs, it contains enough of the API to compile against. The implementation of the APIs is the application server itself, and in this course that means GlassFish 4.0.

So, I use (import) the library:  javax.servlet-api (3.1.0) JAR.

Thursday, April 17, 2014

Good2Know - Heartbleed Bug


Hello my friends,

I thought you might be interested in this article as well as a response in the StackOverflow community regarding my perspective on this Heartbleed Bug. 

The best (or important) part to know in the article is titled “Can heartbeat extension be disabled during the TLS handshake?” This includes the ultimate answer that IT needs to upgrade systems to a fixed OpenSSL version. Or, buy a trusted SSL certificate.

And, this is why I’m not worried about this bug – because I'm not using SSL anyways and, if I did, I would buy an SSL certificate from a trusted security company, and not use OpenSSL.

Otherwise, we all Engineers would have panicked. ;-)

Super thanks to the authors of the article (specifically CODENOMICON) and the StackOverflow responses!


Cheers,

Thursday, April 3, 2014

Learning - Deleting Repository in GitHub

Hello, I hope you are doing well today.

We will learn how to remove a repository in GitHub.

WARNING: If you remove (delete) this repository from GitHub, no one will be able to fork from it, add updates to it, etc.

First, I'm already signed into GitHub and I already have a repository that I wish to remove called "Java".


Okay, let's click on "Java" repository link. As you can see, there's nothing in this repository except for a README file. Next, let's click on "Settings" in the right side of the screen (that is, what I highlighted in blue although maybe hard to see).


After we click on "Settings" link, we want to scroll down to the "Danger Zone" section. In this section, we will click on the button labeled "Delete this repository".


A message will display alerting us that we need to be sure about deleting this repository because once we remove this repository there is no way to get this back. I understand the consequences, so I am going to proceed with entering the name of the repository to remove called "Java" and click "I understand the consequences, delete this repository" button.


Once I clicked this Delete button, GitHub confirms that I have successfully deleted my repository called "Java" and I can also see that my list of repositories does NOT include "Java" anymore. Excellent!!!


And that's it for today! Talk to you soon!

Thursday, March 27, 2014

Learning - updating Java Project in GitHub (via Eclipse & GitHub Client)

Yo', so yesterday we finally learned how to create a Java project and upload ("push") our project to GitHub. That's was great!

Today, we will see how to make updates to our Java project. We are working on this simple Java project called "MyFirstApp". We are storing this project in the Git repository called "HeadFirstJava". Anyone can see this @ https://github.com/gradney/HeadFirstJava

If you missed 'howie' (technically, "how we")...
Ok, what was I saying earlier. Ah yes, making updates to our Java project and pushing our updated project into GitHub repo "HeadFirstJava". Here we go...

First, let's begin with a good practice - by seeing if anyone else updated my project in GitHub. If someone did, then I need to see what these updates are and download (or "fetch") the code updates to my local machine (and sync up my local project).

I open my GitHub Client and click the 'arrow' icon on the HeadFirstJava repository (element?)(I would say 'button', but it doesn't look like a button. It's like a hyperlink that highlights it's element block when the mouse is over it). Alright, so we opened this repo directory in GitHub Client and see no files or folders are un-synced.


Great, now we can proceed with making updates in our Java project.

In the book "Head First Java" (by Kathy Sierra & Bert Bates), we read through the pages and reach page 9. This is where my first application comes from. I will add the rest of the code into MyFirstApp program (via Eclipse). Later, I will use an editor as instructed by the authors to write my Java programs. However, this means that we also need to learn later how to use Git via Git Bash (shell commands). Until then, let's continue with the approach we already know - updating Java project in Eclipse and uploading code via GitHub Client app.

On page 9, I need to add the two statements and I do. Next, I save the updates in my project within Eclipse. My Eclipse shows me that MyFirstApp project is now different (i.e. has been updated) due to the ">" icon next to the folder and file icons of my project.


Next, right-click on "MyFirstApp.java", select Team > Commit... Add a Commit message, check the File "MyFirstApp.java" and click Commit. Now our changes are committed to our local Git repo "HeadFirstJava". Again, to upload our code updates, we open our GitHub Client app and see we are out of sync with the online repo (i.e. my GitHub's HeadFirstJava). Our GitHub Client even has a little 'arrow up' with a number inside a blue ellipse shape that notifies us that our local has an updated version compared to the program stored in our online repo. We also see what has been updated in the screen display within the GitHub Client. This is pretty cool!!! I can already see the updates without having to guess. Incredible!


Simply, click on the "sync" button and watch GitHub Client synchronize GitHub. GitHub Client's History column updates with my comments AND GitHub's HeadFirstJava repo is updated with my code. This is remarkable!


Oh crap! You know what we forgot to do? Yep, we forgot to run our program and make sure the code works before we "committed and pushed" our code to our online repo in GitHub. Well, usually we would run and test our program before "committing and pushing", but for now let's just run and test our program locally to make sure it works.


EXCELLENT! Whew, and we're lucky too (that it worked). If it didn't though, we would just make code updates, test the program, and then commit/push to GitHub repo. Well, that's it for today! Good job, pro!

Oh, just in case, here's a link to the Head First Java book @ http://www.ebooks-it.net/ebook/head-first-java-2nd-edition.

Wednesday, March 26, 2014

Learning - pushing Java Project into GitHub (via Eclipse & GitHub Client)

Hello good people!

Today, the goal - is to push a simple Java Project (created in Eclipse) into GitHub.

I already created a quick, simple Java Project in Eclipse.
  • My Eclipse Workspace Directory = C:\Users\gradney\workspace\Git
  • Name of my Java Project = "MyFirstApp"


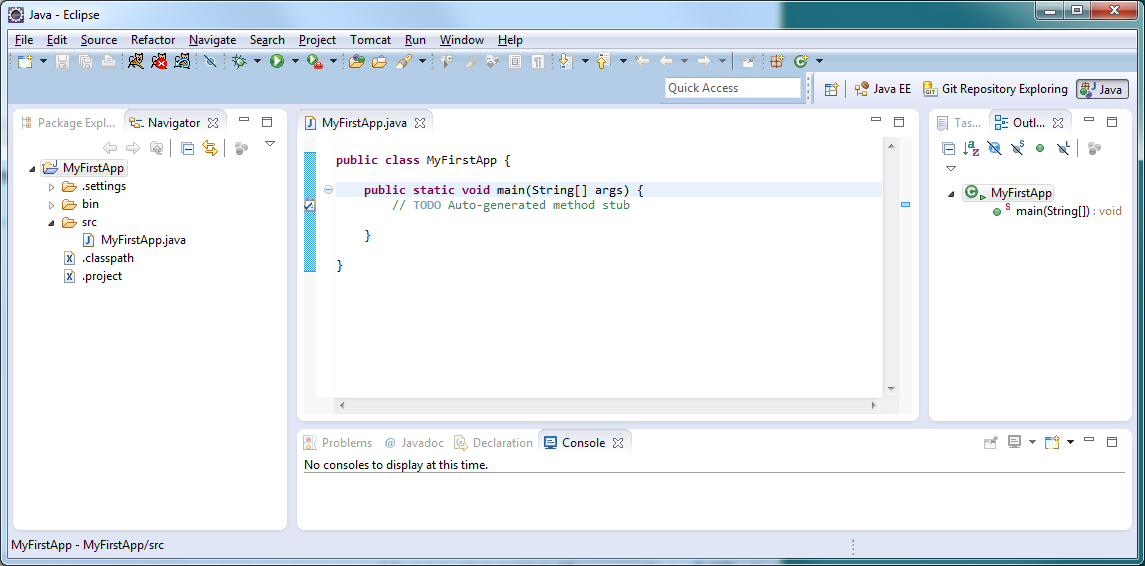
As you can see, I don't really have any code in my project. I only have one Java class with an empty main(). First, I want to see if I can push my Java project into GitHub before I start coding like crazy and having no where to store a controlled version of my coding. If I have no place to store my code, then one day I might lose my code and have to start all over. Ugh, I've done this before and it REALLY sucks. Hence, why I'm blogging about using GitHub.

So, now that I have a Java project, how do I push this into my HeadFirstJava repo in GitHub?

Let's see if sharing this project in Eclipse to my local Git repo will trigger an automatic update in my GitHub Client App.

-------------------------------------------------------------------------------------------

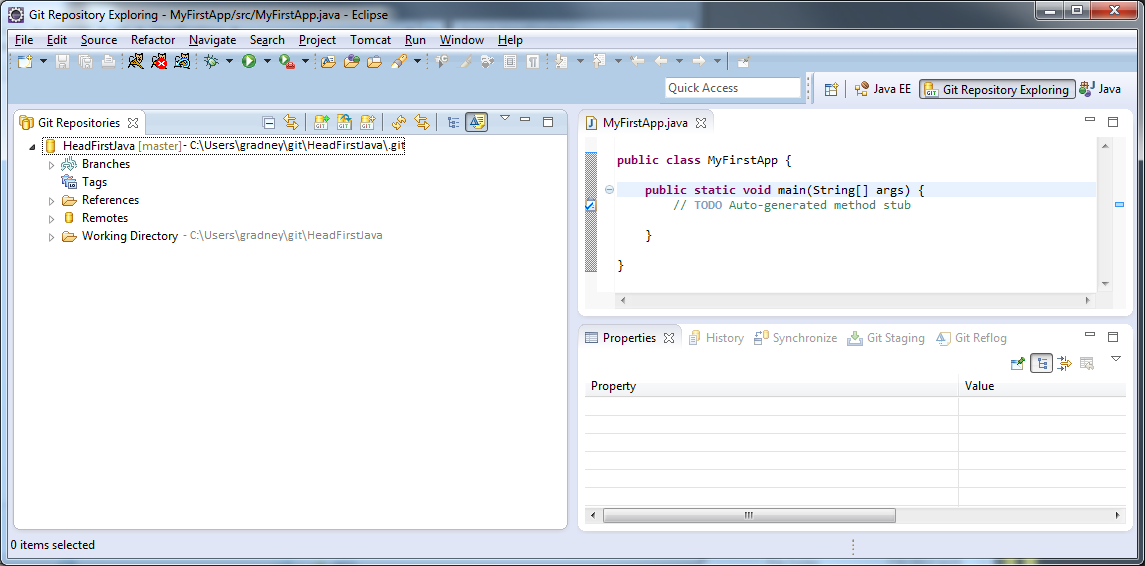
In Eclipse, open the Git Repository Exploring perspective.
Click on "Add an existing local Git repository".
See a dialog display with your Git root directory and listing repositories existing in your local Git directory.
Check the Git repository to add, and click Finish.


NOTE: If I didn't add my local Git repository in Eclipse using the Git Repository Exploring perspective, I will NOT see any existing Git repos listed when I'm trying to share my project (i.e. Team > Share Project... my project).

In Eclipse within the Navigator view (or Package Explorer view), I right-click on the project "MyFirstApp" and select "Team" > "Share Project...".
In Eclipse's "Configure Git Repository" window, I select my "HeadFirstJava" repository from the drop-down option and see how pretty much everything is already set to go.
  • Project = MyFirstApp (checked)
  • Current Location = C:/Users/gradney/workspace/Git/MyFirstApp
  • Target Location = C:/Users/gradney/git/HeadFirstJava/MyFirstApp
Click "Finish".


I now see question marks on my folder and files that are shared into my Git repo.


Next, I right-click on the project "MyFirstApp" and select "Team" > "Commit".
I add a Commit message, check the file(s) I would like to commit (which is "MyFirstApp.java") and I click "Commit".


*I am NOT clicking on "Commit and Push" because I had issues where my Git repo was not pushing my files up to GitHub. Hence, why I'm going to push my files using the GitHub Client App. See my first blog for my struggles.
**(Oct 16, 2014) Using Eclipse IDE Luna, I was able to setup my Git connection to GitHub without issues and able to click on "Commit and Push" without issues. :) Seems like Eclipse Team fixed this.

Notice the question marks on the folder/file icons have disappeared. This must mean my files are committed to my local Git.


If we open up the GitHub Client App, we see that I have my project added and ready to commit (if I haven't already committed in Eclipse).


Once we already commit our files in Eclipse to the local Git repository, GitHub Client App automatically reflects this and provides additional options (such as reverting, sync'ing to GitHub, etc.).


I want to "push" my project up to GitHub which means I want to publish everything locally in my HeadFirstJava repo to my online repo in GitHub called HeadFirstJava. This is basically sync'ing my local and my online repos. So, I click on the "sync" button.

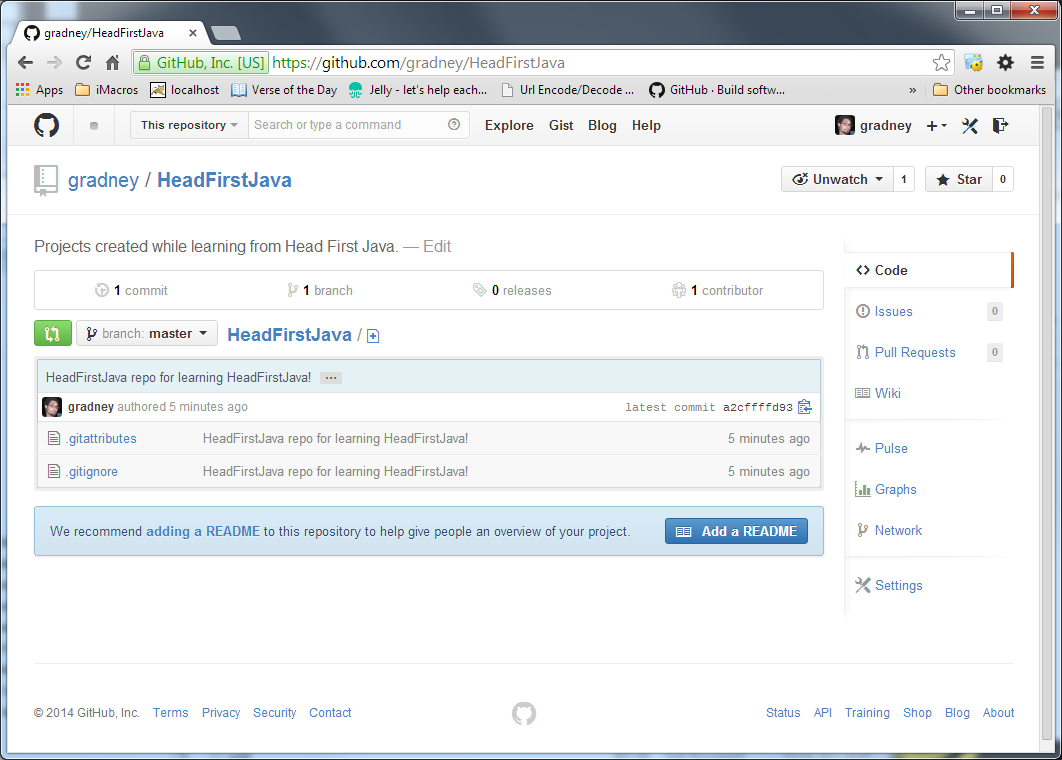
Then, let's go to my GitHub and see if we achieved our goal for today - adding a Java Project into GitHub.
YES!!! Success!! MyFirstApp is stored in my GitHub repo called HeadFirstJava.


And I can navigate within the project in GitHub to that I uploaded the right code for MyFirstApp project. EXCELLENT!


Tuesday, March 25, 2014

Learning - using GitHub's Client App (for Windows)

Yo,

So, in my last post I just kept running into all kinds of issues with trying to use EGit to create a quick Java Project and push up to my GitHub (on my Windows 7). Today, we try a different approach. Let's go through the client app created by GitHub @ http://windows.github.com/

Before I go through these instructions by GitHub, I still have the following set paths:
  • My GitHub Java Rep:  https://github.com/gradney/Java.git
  • My Git root folder:  C:/Users/gradney/git
    • only thing in this folder is my global core.excludes file:  .gitignore
  • My Workspace folder:  C:/Users/gradney/workspace/Git
    • Although I still use Eclipse, I am not using EGit (i.e. Git plug-in for Eclipse).
I downloaded the "GitHub for Windows" client app. We'll call this GitHub Client. When I clicked on "create" for creating a new repository, I noticed this Client was trying to store my new repos in a new default path as "C:/Users/gradney/Documents/GitHub". Let's change this, in the Client's "tools", to what my git uses:
  1. Updated default GitHub folder to:  "C:\Users\gradney\git"
  2. Updated default shell to:  Git Bash
Instead of creating a local repository, let's sign into GitHub via this Client. I'm officially logged in, but I don't see any difference. I create a new repo:
  1. Name:  HeadFirstJava
  2. Description:  Projects created while learning from Head First Java.
  3. Path:  C:\Users\gradney\git\HeadFirstJava
  4. Push to GitHub:  True (checked)
  5. Keep this code private:  False (unchecked)
  6. Account:  gradney (checked)
Click Create, and I get this nice little window for confirmation. I open this repo and see initial files.


I also see this repo (i.e. HeadFirstJava) created via Windows Explorer.


I go into my HeadFirstJava folder via the Windows Explorer.


Yes, we are making progress! And I see it's already in my GitHub, yes!!!

Okay, what next? Well, let's open the .gitignore file to see its content. Oh great! GitHub already added all the files that should NOT be uploaded into GitHub. Whew, thanks a lot GitHub folk!!!

So, maybe I can create a Java Project with Eclipse now. Before I do, let's add a Summary, Description for Uncommitted changes, and then "Commit changes" in the GitHub Client. Nice, we have "Unsynced commits" which is a good sign. Next, click on "publish" in the GitHub Client first and see what happens.


Yes! I also clicked on "sync" in making sure everything was sync'd. And, my files are committed online as we can see! I'm feeling really good now (especially after all the trouble I had yesterday and this morning).


Oh, let's add the README file as recommended by GitHub. Online, let's click on "Add a README" button. I'm pretty satisfied with what GitHub added automatically into this README file. I add a quick title and description, and then click on "Commit new file" at the bottom of the webpage.

Here's something interesting: I just added a new file via online in GitHub but I don't have this downloaded to my local Git repo. What do I do (in sync'ing the two)?

Well, this is beautiful - GitHub Client already connects and establishes a claim that our local repo is not in sync with the online repo (i.e. GitHub). The nice little, light blue icon (with the number of updates missing from my local) is displayed next to the "sync" button. All we have to do is click "sync" and our local will sync up with GitHub. This also updates in our Git root folder (C:\Users\gradney\git\HeadFirstJava). Perfect!!!


Now, we can proceed towards the main objective - creating a Java Project to publish to GitHub. Hopefully I can put this up tomorrow. Until then, Peace! :)

Monday, March 24, 2014

The Journey Begins - learning Java (in Eclipse IDE) and Git

Hello my good people!

I really wanted to avoid this, but I am starting to realize that the best way to code and remember what I'm coding (along with configurations and all) is through writing down my experiences and listing my references. Blah, wish I could skip all this and just load everything into my fat brain like in the Matrix. Anywho...learning the new kung-fu (i.e. coding) - begins.

Assignment:  Create a simple Java application and push up into my GitHub repo.

  1. I already have a GitHub account.  https://github.com/gradney
  2. I had to reset the password because I haven't used this since July 2013. Sucks to have to start all over.
  3. Login to GitHub is now successful. I didn't like the duplicate "menbuild" in the online path for MenBuild repo (i.e. https://github.com/gradney/menbuild/menbuild) and deleted this repository. I want this path to look like https://github.com/gradney/menbuild.
    1. To delete GitHub repo, see @ https://help.github.com/articles/deleting-a-repository
  4. In starting all over, I decided to redo the simple GitHub tutorial for starters.
    1. See my results @ https://github.com/gradney/Hello-World
    2. What is Markdown (md)? See more @ http://bywordapp.com/markdown/syntax.html
  5. Next, I opened my Eclipse which I had already connected my Git-specific workspace to GitHub and noticed I still had some old stuff. Since I already deleted the "menbuild" repo, I deleted repo (with its contents) from my Eclipse AFTER I copied any useful files to my Desktop. I was left with the "tester" repo. I'll get to this later.
  6. I started running into a lot of issues with trying to use my existing Eclipse workspace (pointing to C:/User/gradney/git) and pushing projects up to my GitHub. Strangely, I didn't run into issues fetching projects down from my GitHub. Anyhow, tired of being constipated (i.e. running into *push* issues).
  7. I decided that I'm deleting my entire workspace and starting all over with Eclipse. One thing I now realized is what may be significant in keeping Eclipse metadata files separate from Git metadata files. What I had done was make my Git folder also the same as my Eclipse workspace (both pointing to C:/User/gradney/git). From reading the following online article, I'll empty my "git" folder and keep my Git default repository pointing here. On the other hand, I'll create a new workspace specifically for Git projects in Eclipse pointing to C:/User/gradney/workspace/Git.
    1. Using Eclipse with Git, see @ http://www.vogella.com/tutorials/EclipseGit/article.html
  8. Now that I'm starting with a fresh setup with Eclipse (including Git plug-in), I will skip adding the .gitignore file for now. I prefer to keep these files within each Git project because I'm sure there will be specifics later on (according to project's purpose and coding language used) and because I would like to upload this file into GitHub for others to know clearly what all is included in my specific Git projects. In my opinion, anyone who would like to use my projects should be able to fork/fetch my projects (sorry, still learning the lingo of Git world) and run on their local machine w/out any issues.
  9. Let's get to the point of this: Creating a Java project to store in GitHub.
    1. Create a quick Java Project. I'm calling mine "Hello-Java". This will be similar to "Hello-World" done through the GitHub starter tutorial, but this is specific to Java using Eclipse.
    2. How am I doing this? I open the Java Perspective in Eclipse, add a Java Project, create the source files, compile and ensure everything works in Eclipse. (That is, I can run my program in Eclipse.)
    3. Once I finish running my program successfully, I open the Navigator View (since Java Perspective typically opens the Package Explorer). In the Navigator View, I can see all my files in this Hello-Java Project. Here is where I'll want to add my .gitignore file mentioned by Vogella (in link above). I want my .gitignore file to be specific to this Java project. I add this .gitignore file in the Hello-Java folder (not the "bin" folder, not the "src" folder, etc.). It's okay if my other .* files are uploaded like the .classpath because this will help others know what might have also been used to compile my project (like for more complex projects I may use Apache libraries, etc.).
    4. I go back to my tutorial by Vogella and follow through with adding my project my GitHub via Git. I configure my Git Repository as "C:/Users/gradney/git/Java/.git", my Working Directory as "C:/Users/gradney/git/Java". So, I see my Project checked as "Hello-Java", my Current Location as "C:/Users/gradney/workspace/Git/Hello-Java", and my Target Location as "C:/Users/gradney/git/Java/Hello-Java". I click Finish and let's see what happens.
    5. Interesting, I see Eclipse added "[Java NO-HEAD]" to my Hello-Java project in the Navigator View. When I go to my git folder via Windows Explorer, I see a Java folder with a ".git" subfolder and a "Hello-Java" subfolder (with my program). When I go back to my project in Eclipse and right-click on my Hello-Java project and go to Team, I see a bunch of Git commands now. Cool! But wait, I don't see my Hello-Java project in my Eclipse Workspace via Windows Explorer. This is quite strange. Let's continue to see what happens.
    6. Oh no, I just realized something. Maybe my idea of where to place the ".gitignore" file needs to be in the parent folder of the project in git? So, I'll copy my ".gitignore" file from the "Hello-Java" project into the git root folder (C:/Users/gradney/git) and add one line to ignore the RemoteFiles directories.
    7. I continued with seeing the Staging view in Eclipse from Vogella's tutorial, but I'm getting anxious to see how to push my local repository to GitHub. So, I moved forward with going to my "Git Repository Exploring" Perspective, right-clicking on Java repo, selected "Push", ....wait let me keep reading through Vogella's tutorial. Oh shit! I can't create a repo INTO GitHub. I always have to create my repo in GitHub first, and then I can add projects to it.
  10. Let's try again later...
  11. Ok, going through Vogella's Tutorial again - using EGit with GitHub (section 21).
    1. As you can see, I wasted a lot of time already. This sucks! But, I did learn something.
  12. Delete my repository in Eclipse via the Git Repository Explorer. Include deleting from workspace, etc. Check via Windows Explorer that the folders and files are deleted. Checked (and .gitignore file is still in my root git folder).
  13. Following through with Vogella's tutorial and creating a Git Repo on GitHub called "Java".
  14. I copy the HTTPS URL from GitHub to add into Eclipse.
  15. Currently, there are no existing projects in Java Repo, but we'll continue without any projects by saying "next" that we want to import all the existing (zero) projects. Or, we'll just cancel.
  16. Ok, this is not helping.
  17. In Eclipse, go to Git Repository Exploring and add a repository by selecting "Clone a Git repository".
    1. URI:  https://github.com/gradney/Java.git
    2. Host:  github.com
    3. Repository Path:  /gradney/Java.git
    4. Protocol:  https
    5. User:  <myUsername>
    6. Password: <myPassword>
  18. When asked about my Local Destination, I have:
    1. Directory:  C:\Users\gradney\git\Java
    2. Remote Name:  origin
    3. everything else is blank.
  19. Click Finish.
  20. Alright, we have a Git Repo from GitHub. Now, to figure out how to add my project in Eclipse to this repo.
  21. Create a new Java Project.
  22. Once created, right-click and select Team > Share Project...
  23. Select "Git", click Next.
  24. Select Repository:  Java - C:\Users\gradney\git\Java\.git
    1. Leave Working Directory as C:\Users\gradney\git\Java
      1. This is our local Git repository (claimed as our Working Directory).
    2. The following should be stated in the dialog "Configure Git Repository"
      1. Project:  Hello-Java
      2. Current Location:  C:/Users/gradney/workspace/Git/Hello-Java
      3. Target Location:  C:/Users/gradney/git/Java/Hello-Java
  25. Click Finish.
  26. Right-click on Hello-Java project, select Team, select Commit...
  27. Add message into Commit Message, select the Files to commit, and click Commit and Push...
  28. Ok, got an error regarding I'm not authorized.
  29. Let's see, this time I followed through with GitHub's instructions on "Create a new repository on the command line".
  30. I click on my Java repository link in GitHub, and now I see a blank README.md file in my repository. Ok, so my commandline to GitHub is working. But, what about my Java Project to GitHub???
  31. Ok, I'm still getting errors. This just doesn't make sense.
  32. After doing some more searching over the Internet, I found this article @ http://stackoverflow.com/questions/14259265/egit-not-authorized
    1. In the instructions, I would add this clarity:
      1. A. To specify credentials individually for each remote
        1. Open Git Repository Exploring perspective.
        2. Open Git Repositories view.
        3. Expand the git repository. In my case, I had to expand Java [master] repo.
          1. You should see a 'subfolder' (for lack of better word) for Branch, Tags, References, Remotes, and Working Directory.
        4. Expand Remotes subfolder (and see 'origin').
        5. Expand 'origin'.
        6. Right-click on fetching the git repository and select "Change Credentials...".
        7. In the dialog, ensure the Repository is pointing to the desired one (in my case it is "https://github.com/gradney/Java.git") and enter your correct username and password. Click OK.
        8. Do the same for pushing to git repository (by right-clicking on pushing to git repository under 'origin', selecting "Change Credentials..." and entering correct credentials).
  33. Ok, now that we finally resolved the issue with connecting EGit to GitHub, let's see if we can finally create a Java Project and push to my GitHub Java Repo.
  34. In Eclipse, go to Java perspective and create the quick Hello-Java project with a HelloJava class. Make sure it runs without errors.
  35. Once created, right-click and select Team > Share Project...
  36. Select "Git", click Next.
  37. This view is already so much better. My dialog titled "Configure Git Repository" does NOT show the local and destination crap from earlier. Instead, simply has "Use or create repository in parent folder of project" checked, and only the view with the Project, Location, and Repository:
    1. Project:  Hello-Java
    2. Location:  C:\Users\gradney\workspace\Git\Hello-Java
    3. Repository:  ..\..\..\.git
  38. I simply click "Finish".
  39. I see Eclipse is "re-indexing repository gradney" in the lower right corner of my Eclipse screen while the bar is loading. This looks like a good sign.
  40. Waiting for indexing to complete...
  41. Yes, seems to have worked!!! In my Package Explorer (in Eclipse's Java perspective), I finally see the question mark (?) next to my Java project files. This means, in git, that I have new/updated files which are not yet committed and pushed to my repo.
  42. However, when I'm trying to stage my project, I'm running into Java Heap Exceptions in my Eclipse (and my Eclipse is locking up). I decided to add my ".gitignore" file into the Hello-Java project. Eclipse is currently re-indexing.
  43. Ok, so my Eclipse keeps running out of memory because it's trying to stage everything with my one Java project. What a drag! I closed my Eclipse. Well, I added a global .gitignore file into my user folder. I added what Vogella mentions in his article.
    1. Location of my global .gitignore file @ C:/Users/gradney/.gitignore
  44. I open my Eclipse and let's see what happens. The Git Staging view has disappeared. Maybe that's a good thing. Let's see if we can right-click on our Java project and commit.
  45. Nope, still running into issues. Ok, this is just too much. Tomorrow, let's just use another Git client, and only use Eclipse for Java projects. How disappointing. I'm very disappointed with EGit. Not sure what happened from last summer until now. Last summer it was working great. Now, it's garbage.
  46. Or maybe this has something to do with my work machine. 
I almost forgot to say some important specs (i.e. specifications). Here's the software I'm using:
  • My operating system is - Windows 7
  • Java 7 - jdk1.7.0_21
  • IDE, not sure of the version, but using - Eclipse IDE Juno
    • don't forget the Git plugin
  • Git version 1.8.1.msysgit.1
  • PSPad (my favorite text editor)